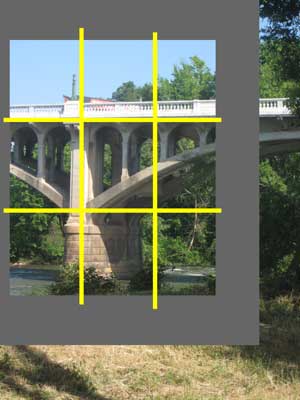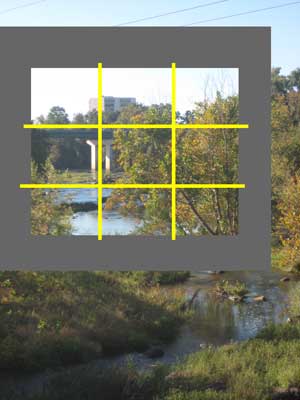
Line up major lines of the image with lines at thirds in the viewfinder. Don't forget a landscape painting can be in a vertical format.
Now that the weather is getting warmer, it’s time to do some plein air painting!
Last fall I suggested starting in your own back yard to get comfortable with setting up your easel and making sure you have all the necessary supplies. So what do you do when it’s time to venture out beyond your own yard?
When I first started painting outdoors, I spent a lot of time driving around looking for the perfect spot. Believe me, there is never a perfect spot. There is always light at the wrong angle, or there’s a cell tower in the way, or the sun sets too fast. Not to mention BUGS. Anyway, I wasted a lot of time and gas looking. Then I started painting with a group where someone else chose the location, and I had to make something out of whatever was there. I also saw other artists make beautiful little paintings of an old tire swing or a fire hydrant, and I began to realize that the artist’s job is to see what others don’t and to create beauty from mundane situations. If you can do that, you can make a painting almost anywhere.
Even though no location is perfect, some are better than others. Here are a few suggestions for your first few excursions:
- Paint with a group if possible. It’s safer than going alone, and you can learn from more experienced painters while enjoying the camaraderie.
- Find a place in the shade for your easel. If you paint with the sun on your easel, your painting will be too dark.
- Find a spot where you are sideways to the light. That is, the light comes from the left or the right, not from behind your back or directly in your eyes. This helps to create a 3-dimensional look to your objects because they will have a light side and a shadow side.
- Use the viewfinder in your camera or a piece of cardboard with a rectangular hole about 1×1.5 inches to narrow your field of vision and help you focus. Imagine two vertical lines and two horizontal lines dividing your image into thirds each way so there are 9 sections (think tic-tac-toe). Adjust your viewfinder so that major horizontal and vertical lines in the landscape are along the imaginary lines. For example, place the horizon or edge of a lake one-third of the way up from the bottom. And put a tall tree or building at one of the vertical lines. With the basis of your composition established, draw the main lines in the same position on your support, and then draw the rest of the shapes as they relate to the main structural lines.
- Don’t worry if you don’t get further than the drawing the first few times. Painting outdoors can be overwhelming, so don’t stress about whether you finish your painting. Just relax and enjoy the process.
If you are ready to get started, you’re invited to join the About Face group for a plein air day this Saturday, February 19, at the USC Horseshoe. Meet at the Sumter Street gate at 8:30 a.m. or look for painters around the Horseshoe during the morning. We’ll meet at Diprato’s Delicatessen at 11:30 for lunch. See you there!
